


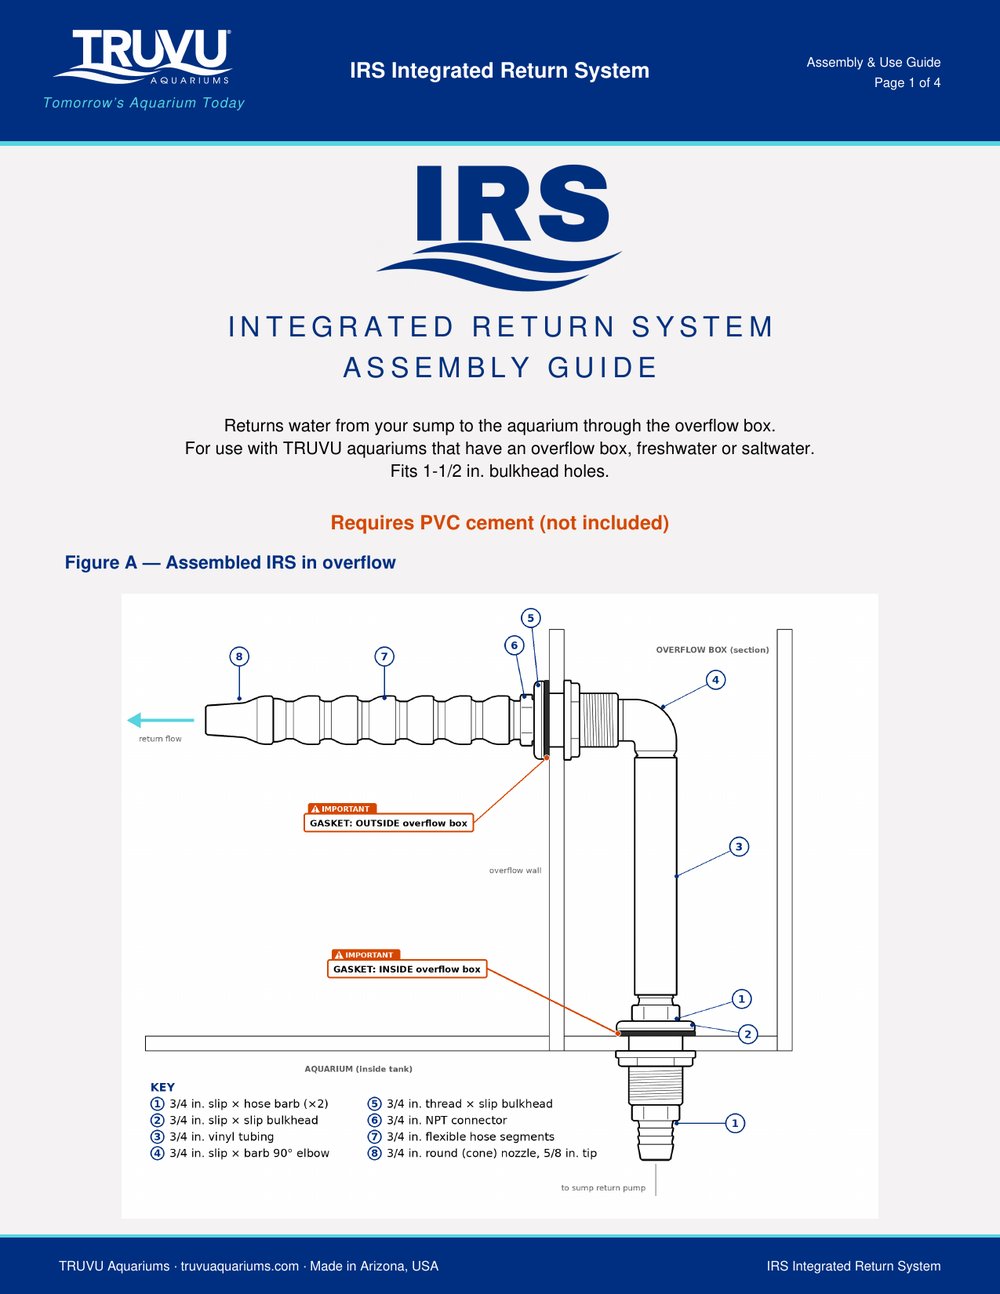
This page has the full assembly and installation instructions for the TRUVU IRS (Integrated Return System) Overflow Return Kit. The kit returns water from your sump pump to your aquarium through the overflow box, so there is no return pipe hanging over the back of the tank. Read the steps below, or download the printable PDF guide with drawings for each step.
Download the IRS Overflow Return Kit assembly instructions (PDF, 4 pages)
Shop the TRUVU IRS Overflow Return Plumbing Kit · All TRUVU manuals & instructions
Before you start
- For TRUVU aquariums with an overflow box, freshwater or saltwater.
- Needs two bulkhead holes in the overflow box: one in the bottom and one in the wall just below the skimming teeth. Fits 1-1/2 in. bulkhead holes.
- All plumbing is 3/4 in.
- PVC cement is required (not included). You can get it at your local home improvement store.
- Tools: heavy-duty scissors to trim the vinyl tubing, a marker, and rags to catch PVC cement drips.
IRS kit contents (3/4 in. plumbing)
The part numbers below match the part numbers in the steps and in the PDF drawings.
- Part 1: 2 × 3/4 in. slip × hose barb straight fittings
- Part 2: 1 × 3/4 in. slip × slip bulkhead
- Part 3: 1 × length of 3/4 in. vinyl tubing (choose the length for your tank height)
- Part 4: 1 × 3/4 in. slip × barb 90° elbow
- Part 5: 1 × 3/4 in. thread × slip bulkhead
- Part 6: 1 × 3/4 in. NPT connector
- Part 7: 1 × 3/4 in. flexible hose segment (about 6 in.)
- Part 8: 1 × 3/4 in. round (cone) nozzle, 5/8 in. tip
How to assemble the IRS overflow return kit
Assemble the return from the bottom of the overflow box up to the nozzle.
Step 1: Install the bottom bulkhead (overflow bottom)
Glue the two 3/4 in. slip × hose barb straight fittings (part 1) into the slip × slip bulkhead (part 2), one in each end, with PVC cement. Then install the bulkhead in the overflow bottom hole with the flange and rubber gasket inside the overflow box (gasket between the flange and the bottom), with the nut underneath. Firmly snug it. Do not overtighten the bulkhead nut; that can crack the bulkhead fitting.
Warning: Do not glue the 3/4 in. slip × barb 90° elbow (part 4) yet.
Step 2: Install the upper bulkhead (overflow wall)
Install the 3/4 in. thread × slip bulkhead (part 5) in the upper overflow hole with the flange and rubber gasket on the outside of the overflow box (gasket between the flange and the outside face of the overflow wall), with the nut inside the box. Firmly snug it. Do not overtighten the bulkhead nut; that can crack the bulkhead fitting.
Warning: Do not glue the 3/4 in. slip × barb 90° elbow (part 4) yet.
Step 3: Fit the elbow and tubing (test fit)
- Slip the 3/4 in. slip × barb 90° elbow (part 4) into the upper bulkhead (part 5). Do not glue it.
- Push the 3/4 in. vinyl tubing (part 3) onto the upper hose barb of the bottom bulkhead (hose barb, part 1).
- Mark the tubing at the top of the elbow's (part 4) hose barb and trim it there with heavy-duty scissors.
- Remove the elbow, slide the tubing onto the elbow's hose barb, then slide the elbow back into the bulkhead to test fit.
- Trim a little more and test again as needed, until the tubing (part 3) fully covers both the elbow (part 4) barb and the lower hose barb (part 1).
Warning: Do not glue the 3/4 in. slip × barb 90° elbow (part 4) yet.
Step 4: Glue the elbow
Glue the 3/4 in. slip × barb 90° elbow (part 4) into the upper bulkhead (part 5), with the vinyl tubing on its hose barb. Be careful not to get any PVC cement on the acrylic. Place rags under the joint so any spills land only on the rag. Let the glue fully cure according to the glue maker's instructions.
Step 5: Assemble the nozzle
Assemble the 3/4 in. NPT connector (part 6), the 6 in. flexible hose segment (part 7), and the 3/4 in. round (cone) nozzle with 5/8 in. tip (part 8). Thread the NPT connector into the upper bulkhead. Aim the nozzle into the tank.
Step 6: Connect the pump line
Connect the return line from your sump pump to the lower hose barb on the bottom bulkhead. Use 3/4 in. ID aquarium tubing. Support the tubing so it does not stress the bulkhead.
Warning: Never hard-plumb a return line from the pump to the aquarium. Pumps give off vibrations that break down the seams between PVC pipe and fittings and can cause leaks later. Using at least a section of aquarium tubing, or tubing for the entire return line, absorbs those vibrations and helps prevent future leaks.
Installation is complete. Enjoy your aquarium.
IRS overflow return kit FAQ
What size holes does the IRS kit need?
Two holes sized for 3/4 in. bulkheads (1-1/2 in. diameter): one in the bottom of the overflow box and one in the overflow wall just below the skimming teeth.
Is PVC cement included?
No. PVC cement is required but not included. It is available at your local home improvement store.
Which tubing length should I order?
The vinyl tubing length matches the height of your aquarium. Choose the size option for your tank height when you order the kit.
Can I hard-plumb my return pump to the IRS kit?
No. Use aquarium tubing for at least part of the return line. Hard plumbing passes pump vibration to the PVC joints and can cause leaks over time.
Need help? Contact TRUVU Aquariums. TRUVU aquariums and plumbing kits are made in Arizona, USA.
TRUVU IRS Overflow Return Kits are assembled in Arizona.